The Complete Guide to Lenticular Printing

Everything You Need To Know Before You Buy

Pao Houa Her, untitled, 2022–24, from Pictures of paradise. Six 3D lenticular prints mounted on panel, 70 × 264 in. Courtesy of the artist and Bockley Gallery.

01. A Note to the Reader

This guide puts Tracer’s full expertise at your fingertips, covering everything from how lenticular technology works to file specifications, design best practices, and how to get started — so you can move forward with clarity and confidence. Please reach out whenever you have questions. We’re here to help.

Lenticular printing rewards good information. The more you can tell us about your project — how it will be displayed, who will view it, and from what distance — the more precisely we can engineer your result. Share the details and we’ll take it from there.

We understand that budgets are real. At Tracer, every project is engineered to deliver maximum visual impact within your parameters — not just what’s technically possible, but what’s right for your application.

If your project involves standard effects and you’re comfortable working independently, we also encourage you to explore Express Solutions — a cost-effective, self-service pathway that may be exactly what you need.
02. What is Lenticular Printing?

How the Technology Works

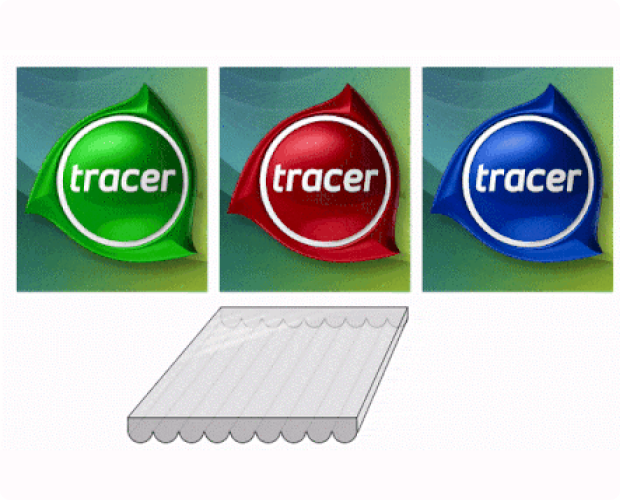
Lenticular printing uses precision-engineered lenses to produce images with striking illusions of depth and motion. Research shows that lenticular images not only hold attention longer than traditional prints but also leave a lasting, favorable impression — lenticular ads are significantly more memorable than traditional 2D ads, and viewers spend measurably more time engaging with them. Lenticular prints create a striking, memorable impact in art installations, advertising signage, direct mail, custom gifts, and more.

The lens is a transparent plastic sheet with tiny ridges, called lenticules, on the viewing side and a smooth finish on the print side. These lenticules are engineered with specific viewing angles and radii, allowing your eyes to focus on different aspects of the image, resulting in the perceived depth or movement.

To create this effect, images are digitally interlaced to match the lens’s geometry. This process involves dividing each image into thin strips that are repeated across the lenticular surface. When these strips are printed on the lens’s back and viewed from various angles, they generate the desired illusion.

Different effects — depth, motion, or a combination of both — are achieved through different lens orientations, a concept covered in detail in Section 8: Design Specifications.

03. Lenticular Effects

Tracer’s award-winning lenticular graphics create a high-impact visual experience that far exceeds that of traditional printing. It’s so much better, it’s in a class of its own.

Tracer produces the full range of lenticular effects — from classic flips to immersive 3D depth to full motion video. Each effect has its own visual character, design requirements, and ideal applications. Understanding the options is the first step in choosing the right effect for your project.

Full Motion Video Simulates a short video clip.

3D - Tracer's true volumetric 3D creates the illusion of depth of a live scene — some elements appear to leap off the page while others recede into the background. Ideal for landscapes, portraits, and any image with strong foreground and background elements.

Flip - Dynamically swaps 2 or 3 images or segments within an image.

Morph - Transforms one image into another, great for before and after.

Combo - Combo pairs volumetric 3D with a motion effect in a single print — images leap off the surface and switch as you move. Ideal for pieces that need to catch the eye from a distance and reward a closer look, such as retail displays, trade show graphics, and gallery installations.

Because the two effects share one lens, orientation is engineered case by case — talk with us early so we can build the combination around your artwork.

Zoom - Brings an image from the background to the foreground.

Hybrid – Combines multiple effects in one print, custom-built for your vision.

04. Tracer's Expertise & Proprietary Technology

Tracer’s lenticular graphics are superior to traditional lenticular products due to a portfolio of patented print technologies and a staff considered some of the industry’s most trusted experts. We don’t just print lenticular — we engineer it.

The big picture starts with the little picture.

The industry's smallest dots, for the sharpest effects

Every lenticular print is made up of millions of dots, which form lines to match the lenticular lens. Tracer’s proprietary screening allows us to print the smallest dots in the industry, resulting in the cleanest, sharpest effects possible.

You're either in-register or you're not.

Patented alignment for seamless multi-panel installations

Tracer is the expert in precision-aligned dot printing. This process produces a precision line array that creates the visual architecture of our prints — and must match perfectly to the lenticules of the lens. Our patented alignment technology extends this precision to oversized lenticular installations, enabling tiling of multiple panels with no visible seams.

Let's roll.

Proprietary lens materials, including a rollable option

Lenticular graphics depend on the quality of the lens. Tracer uses the highest quality lens material engineered for specific effects, viewing distances, and display environments — including a rollable option that is less expensive, yet high definition, and far more cost effective to transport than typical rigid lenses.

From one to one million.

No minimums, no maximums

We utilize both digital flatbed and offset presses, giving us the flexibility to produce one-off projects and high-volume runs with no minimums or maximums. All interlacing is performed in-house by our technical team, who select the optimum lens for every project based on artwork, effect, viewing distance, and display environment.

Backlit? No problem.

Verified under a calibrated lightbox

Tracer produces backlit lenticular prints reviewed on our adjustable lightbox ensuring accurate vibrant colors and crisp effect performance under illumination, including critical color projects.

The best lenticular starts with a conversation.

Bring us in early — it makes a difference

Tracer’s team works directly with clients from the earliest stages of a project — bringing both technical expertise and genuine creative passion to every engagement. The more we understand about your vision, your audience, and your display environment, the better we can engineer a result that exceeds your expectations. We understand both the art and the science, and we love what we do. Contact us early — it makes a difference.

05. Our Process: From Inquiry to Production

Every Tracer project follows a proven path — from first conversation to finished piece. Here’s what to expect at each stage.

06. How to Buy Lenticular Printing

Tracer offers two pathways for lenticular printing — designed to fit different project types, budgets, and levels of support. We have numerous certified lens options and select the lens that will yield the best results specific to your lenticular image and display requirements.

Custom Solutions

Best for: Creative directors, professional artists, and print buyers seeking creative guidance and technical support

Buying Experience

Expert consultation and technical assistance; proofing options; custom quote included

Effects

2-Flip, 3-Flip, Zoom, Morph, Full Motion Video (FMV), Volumetric 3D, 3D Flip/Combos, Hybrid

Size and Shape (W×H)

Oversized panels, backlit lenticular, custom shapes — any idea can come to life

Sample Applications

Fine art prints, high-impact wall art, trade show graphics, retail signage, restaurant and gallery installations

Express Solutions (DIY)​

Best for: Budget-focused buyers comfortable working independently, without consultation or technical support

Buying Experience

Automated self-service process — saves $150–$200 in production setup fees


Effects

2-Flip, 3-Flip, Zoom, Flip-Zoom


Size and Shape (W×H)

11″×14″ to 46″×70″, rectangular and square shapes only.

Sample Applications

Fine art prints, display signs

Quick Decision Guide

Choose Custom Solutions When:

Choose Express Solutions When:

Not sure which path is right for you? Contact us at sales@tracer.com or call +1 (914) 945-7000 and we’ll help you determine the best approach for your project and budget.

“I was able to hold one of the Burlington HS cards in my hand today and it looks great! I’m hoping we can do more with lenticulars in the future.”

— Gerhard Mullican, Tappe Architects

“I received the 3D lenticular and wow, it’s pretty amazing! It was difficult to visualize what it would look like from the digital proof but I love the final result and can now get an idea from a digital proof in the future. The tonalities are perfect and for lack of a better way to describe it the image moves and is 3 dimensional even from a distance.”

— Joseph McDonald, Digital Grange

“The backdrop lenticular arrived today. I am very happy with it and that would be an understatement. I love it. Tracer did a great job. The lighter sepia tone is perfect. I have 2 or 3 more files to send you to put in the queue after the Ghosts one is finished.”

— Joseph McDonald, Digital Grange

“The Easter Island print arrived safely earlier today and, as my son would say, it SLAPS! Just awesome”

— Alexis Gerard, Photographer

“They arrived and are absolutely fantastic!!”

— Brittney Hendricks

“My press check today went great! The team had 1/2 the panels for viewing, a nice surprise. Looks wonderful.”

— Airport Installation Client

“I got my prints back (order #5836) and framed and they look absolutely amazing. I could not be more pleased with them.”

— Arlyn Villaruz, USC

“Thank you!! Beautifully done as always.”

— Miggs B Design / Artist

“I picked up the framed piece while dropping off the second lenticular print. We are proceeding with having that framed with the same materials — proof of how much we like everything about this project! Well done to the Tracer/Purdy team!”

— Tom Purdy

07. Technical Primer: Pixels, Resolution & DPI

If you open any image file in any photo editing program and zoom in far enough, you will see that your image is a grid — a neatly arranged mosaic of small, equally sized squares. These squares are pixels, always arranged in rows and columns.

The number of pixels and how they are distributed defines the pixel dimensions (also called pixel resolution). For example, an image with pixel dimensions of 3000 × 2400 pixels has 3,000 pixels across each row and 2,400 pixels in each column. Total pixels = width × height.

What Is DPI?

DPI (also known as PPI) stands for Dots (or Pixels) Per Inch. It defines the print resolution — how densely the pixels are packed into each inch of the printed output. Higher DPI means more detail and sharper imagery at the intended print size.

At 200 DPI, every inch of the printed image contains 200 pixels across and 200 pixels down. So an image with pixel dimensions of 3000 × 2400, printed at 200 DPI, produces a print 15 inches wide by 12 inches high — 3000 ÷ 200 = 15, and 2400 ÷ 200 = 12.

Application

Recommended DPI

Notes

Large Format Lenticular

200 DPI

Required for optimal print quality

Small Format Lenticular

300 DPI

Higher density required for small effects

Express Solutions (40 LPI)

Per DIY builder specs

Follow online builder guidelines

How to Check Your Image's Pixel Dimensions and DPI

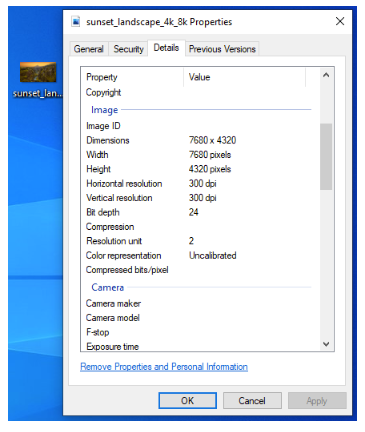
On Windows: Right-click the image file and select Properties. Go to the Details tab and scroll to the Image section — pixel dimensions and resolution are listed there.

Windows image properties showing pixel dimensions and resolution

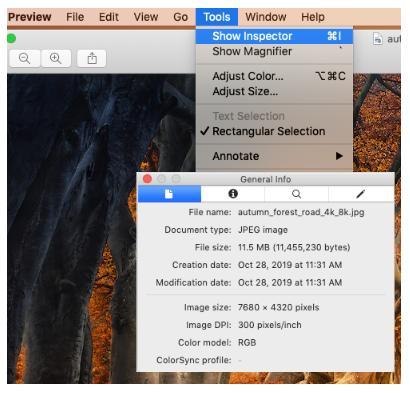
On a Mac: Right-click the image file and open with Preview. Press ⌘ + I or go to Tools → Show Inspector. A window will display all relevant image details.

Mac Preview Inspector showing image dimensions and resolution

How to Set Your Image to 200 DPI in Photoshop

On Windows: Right-click the image file and select Properties. Go to the Details tab and scroll to the Image section — pixel dimensions and resolution are listed there.

Note: the Express Solutions DIY builder accepts JPEGs, PNGs, and TIFFs only.

Pixel Count Quick Reference Chart

Print Size (W" × H")

DPI

Pixel Dimensions

11" × 14"

200

2200 × 2800

16" × 24"

200

3200 × 4800

18" × 24"

200

3600 × 4800

20" × 28"

200

4000 × 5600

20" × 36"

200

4000 × 7200

22" × 28"

200

4400 × 5600

24" × 36"

200

4800 × 7200

32" × 42"

200

6400 × 8400

38" × 48"

200

7600 × 9600

42" × 56"

200

8400 × 11200

46" × 60"

200

9200 × 12000

46" × 70"

200

9200 × 14000

08. Design Specifications

Lenticular artwork carries requirements that flat printing does not. This section covers lens orientation, file specifications for large and small format, type sizing by lens pitch, and the Express Solutions builder — settle these before you build production files.

Design Orientation

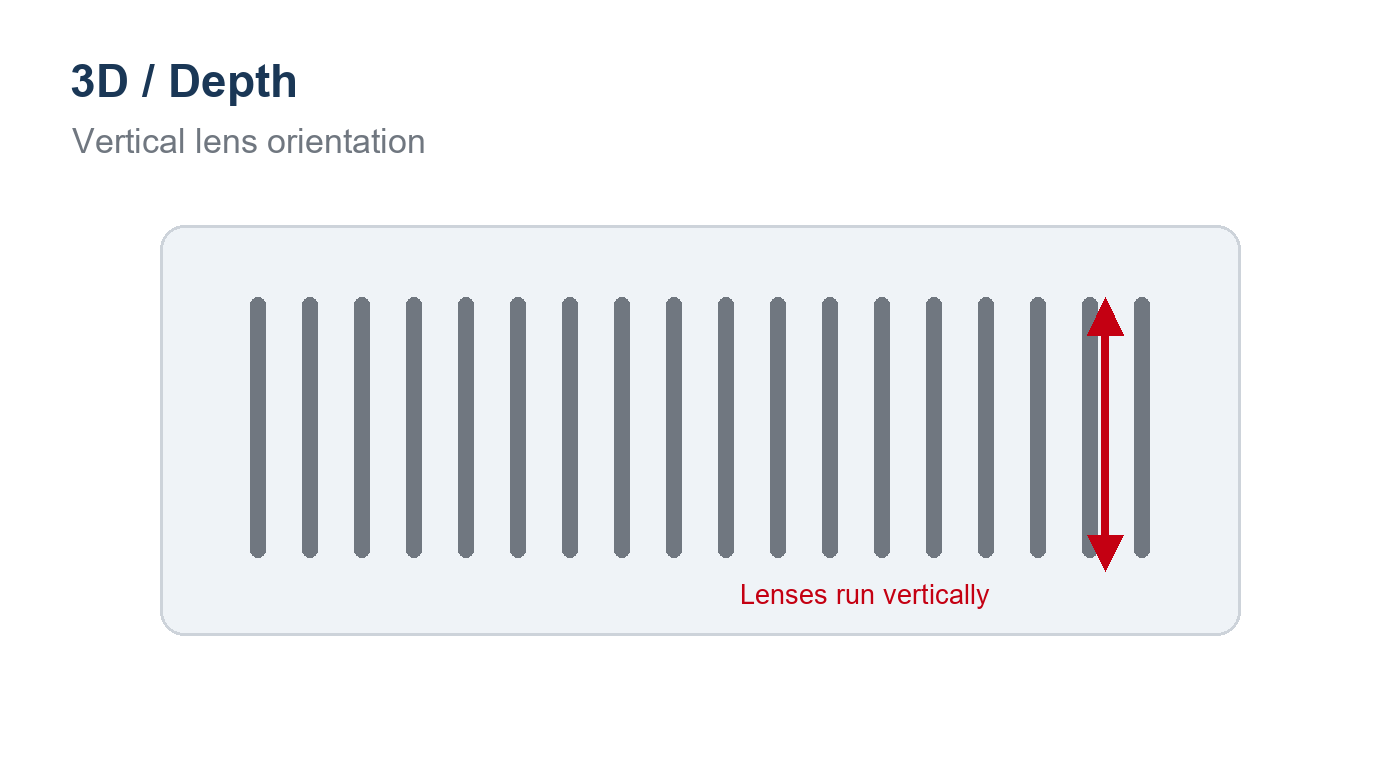
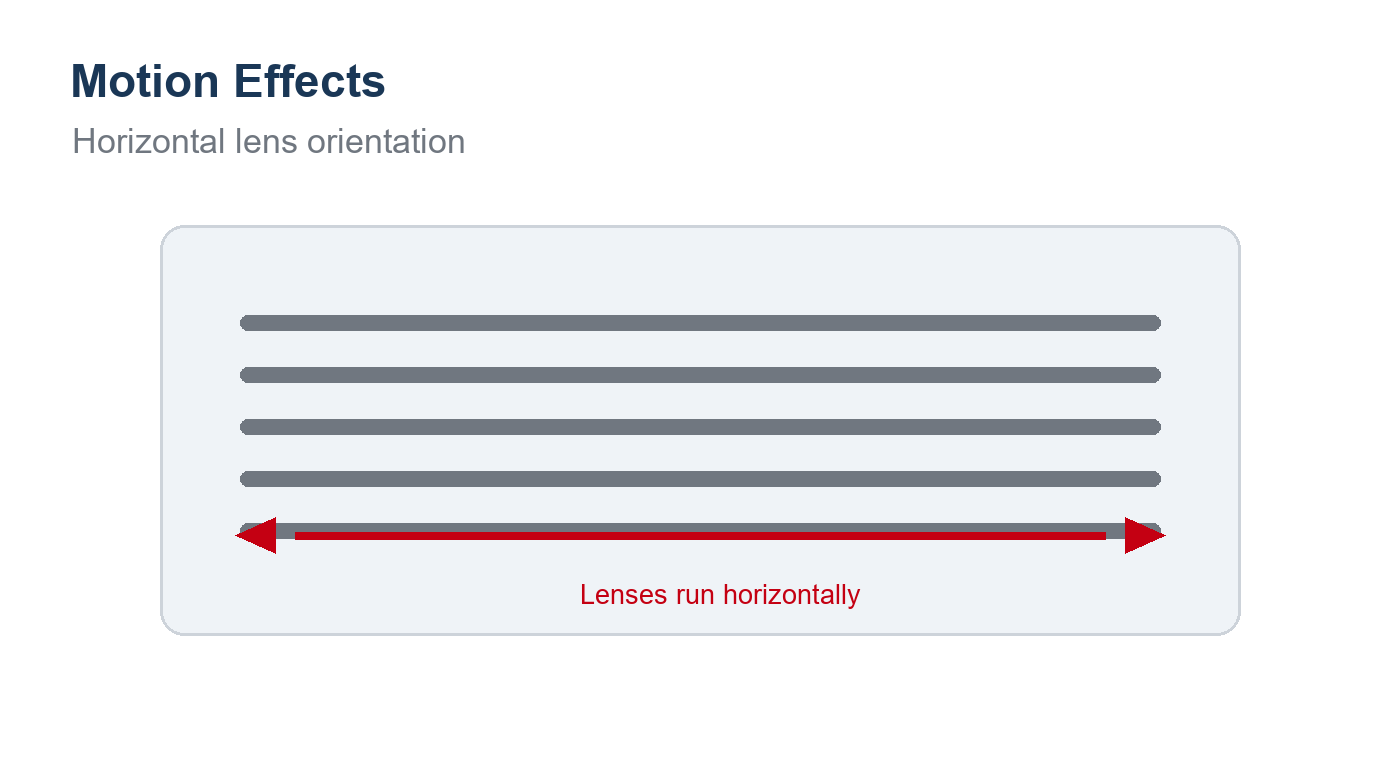
Understanding how lens orientation and viewing direction interact with your chosen effect is essential before preparing your files. The diagram and table below show how each effect category maps to lens orientation and viewer motion.

3D

Diagram showing vertical lens orientation for 3D depth effects

Lens orientation: Vertical (top to bottom)

Viewing motion: Eyes shift left to right (parallax)

Motion (Flip, Zoom, Morph)

Diagram showing horizontal lens orientation for motion effects

Lens orientation: Horizontal

Viewing motion: Tilt the piece up and down

Effect Type

Lens Orientation

Viewing Motion

3D

Vertical (top to bottom)

Eyes shift left to right (parallax): lens runs vertically

Motion (Flip, Zoom, Morph)

Horizontal

Tilt the piece up and down

3D Flip/Combos

Custom

Consult with Tracer

Large Format Design Guide

Specification

Requirement

Preferred File Format

.psd (Photoshop), layered files preferred

Minimum Resolution

200 DPI at final output size

Bleed

Required – 1/8" extra image area beyond final trim for clean cutting

Animation Direction

Specify intended viewing direction in file notes

3D Effects Files

Foreground/background separation; avoid busy backgrounds. Backgrounds must extend at least 1/2" beyond crop on each side to account for parallax shift

Flip Effects Files

Each image should be clean and distinct. Images work best when they share similar color, contrast, and background; extremes increase risk of ghosting

Zoom Effects Files

Consistent composition across frames; clear focal point. Works best with tight, well-defined objects; avoid thin linear patterns (more risk)

Morph Effects Files

Ensure elements align across transitions; works best on well-defined shapes with minimal size/placement differences

Motion/FMV Files

Use highest quality source footage available. Cyclical motion elements minimize ghosting and enhance motion

Background Recommendations

Simple, uncluttered, consistent backgrounds minimize ghosting

Font Recommendations

Bold fonts; avoid thin serifs at small sizes

Vector Art

Rasterize into the layered file at 100% final size/resolution; send original vector files alongside when possible

Small Format Design Guide

Specification

Requirement

Resolution

300 DPI at final output size

File Format

.psd or approved format; layered files preferred

Minimum Font Size

12pt or larger; use bold fonts

Background

Simple backgrounds essential – complexity causes ghosting at small scale

Bleed

Required – 1/8" per product specifications

Type Guidelines

Typography affects readability, especially at small sizes. Use bold, clean fonts and avoid thin strokes. The table below shows minimum recommended point sizes; for better clarity, use point sizes 3 to 5 larger than the minimums shown.

Lens Pitch (LPI)

Minimum Point Size

20

24

30–40

18

50–60

14

75

12

100+

8

When preflighting your files, Tracer will advise you of any fonts that are of print concern.

Express Solutions (DIY) — 40 LPI Lens

Express Solutions uses a 40 LPI (lenticules per inch) lens and is limited to 2-Flip, 3-Flip, Zoom, and Flip-Zoom effects. File specifications are provided through Tracer’s online DIY builder. Express Solutions accepts JPEGs, PNGs, and TIFFs only. This is the most cost-effective pathway for straightforward, standard-effect projects.

09. Frequently Asked Questions

What is lenticular printing?

Lenticular printing is a technology that uses a ridged plastic lens to create the illusion of depth, motion, or transformation in a printed image. The lens directs different portions of the image to your eyes depending on the viewing angle, creating animated effects from a flat surface.

Lenticular printing is used for retail displays, point-of-purchase signage, trade show graphics, outdoor advertising, direct mail, packaging, promotional products, fine art prints, and more. Any environment where visual impact and attention are priorities is a candidate.

3D/Depth, Flip, Zoom, Morph, Full Motion Video (FMV), and Hybrid (custom combinations). Express Solutions supports 2-Flip, 3-Flip, Zoom, and Flip-Zoom with the 40 LPI lens.

It depends on your artwork and your goal. 3D works best when you want depth. Flip is ideal for showing contrast or a message change. Morph suits transformation stories. FMV captures action. Our team can recommend the best effect during the consultation process.

We prefer .psd (Photoshop) layered files. For large format, provide files at 200 DPI minimum at final output size. For small format, 300–400 DPI is required. Always include bleed.

Tracer handles all interlacing in-house. You provide your layered source images and we take it from there. We match the interlacing to the specific lens selected for your project.

We select the optimum lens based on your artwork, desired effect, viewing distance, and display application. Tracer uses and develops proprietary lenses for specific applications.

Individual sheets typically max at 48″ × 72″ or 48″ × 96″ depending on lens and application. For larger installations, we can tile panels seamlessly using our patented alignment system.

No minimums or maximums. We produce one-offs on our digital flatbed press at competitive prices, with no upper limit on offset production runs.

All Custom Solutions projects are quoted based on specifications. Pricing depends on size, effect, quantity, substrate, and finishing. Contact us for a quote. Express Solutions pricing is available on Tracer’s online builder.

Yes. Tracer produces backlit lenticular prints and reviews them on our adjustable lightbox to ensure accurate color and effect performance under illumination.; however, color temperatures can vary from our lightbox to yours.

Ghosting is the faint appearance of one image while viewing another — an unwanted artifact. It is minimized by using high-contrast images, simple backgrounds, and proper file preparation. Our team will advise on file design to minimize ghosting risk.

Custom Solutions supports all effects, all sizes, custom lens selection, and full Tracer consultation. Express Solutions is a cost-effective DIY pathway for standard effects using the 40 LPI lens — ideal for simpler, repeatable projects.

Most jobs are completed in 5–10 working days or sooner. Custom finishing or high-quantity large-format projects may require extended timelines. Contact us for current lead times.

Yes. Tracer’s patented alignment system enables seamless tiling of lenticular panels for large-format displays with no visible seams between panels.

Yes. Proofing begins with an electronic proof simulating your chosen effect. Upon approval, a hard copy contract proof is produced before full production begins. Jobs of fewer than five pieces do not require a hard copy proof unless requested. Backlit projects are reviewed on our adjustable lightbox; however, color temperatures can vary from our lightbox to yours.

Contact Tracer at sales@tracer.com or call +1 (914) 945-7000 to schedule a project consultation. You can also explore Express Solutions for standard projects.

10. Lenticular Glossary

2D-to-3D

Conversion process that adds perceived depth to a flat 2D image using depth mapping and layering techniques.

3D

Stereoscopic effect creating the illusion of dimensional depth within the image.

Bleed

Extra image area beyond the final trim size, necessary for clean cutting.

Combo

An effect combining volumetric 3D with a motion effect (Flip, Zoom, or Morph) in a single print.

Depth Canvas

The total range of depth from foreground to background in a 3D lenticular image.

DPI (Dots Per Inch)

Measurement of print resolution; also called PPI (Pixels Per Inch).

Flip

Quick transition effect between two or more complete images as the viewing angle changes.

Full Motion Video (FMV)

Series of sequential images creating a video-like animation.

Ghosting

Unwanted residual visibility of a secondary image appearing faintly when viewing another.

Hybrid Effect

Custom lenticular effect combining two or more standard effects.

Interlacing

The process of digitally slicing multiple images into thin strips that match lens geometry, then interleaving them for printing.

Lens Gauge

The thickness of the lenticular lens, typically measured in thousandths of an inch (mil).

Lens Pitch

Number of lenticules per inch (LPI) on the lens surface; determines resolution and viewing characteristics.

Lenticules

The individual cylindrical ridges on the viewing surface of the lenticular lens that create the optical effect.

Moire

An unwanted interference pattern that can occur when the interlaced image does not precisely match the lens pitch.

Morph

A gradual, seamless transformation from one image to another.

Parallax

The optical phenomenon in which each eye sees a slightly different view of an image, creating the perception of depth.

Phase

The precise alignment of the interlaced image to the lens lenticules; critical for clean, ghost-free results.

Pixel Dimensions

The width and height of an image measured in pixels (e.g., 3000 × 2400 px).

Registration

The accurate alignment of the printed image on the back surface of the lens to the lenticule geometry.

Viewing Direction

The axis along which the lenticular effect is perceived — vertical (for 3D) or horizontal (for motion effects).

Viewing Distance

The intended distance from which the lenticular piece will be viewed; influences lens and effect selection.

Volumetric 3D

Advanced 3D effect with multiple depth layers creating a highly immersive sense of dimensional space.

Window Plane

The depth layer within a 3D lenticular image where text and logos appear sharpest and most legible.

Zoom

Effect in which elements appear to rapidly change size — from small to large or vice versa.

11. Detailed Design Guides

The guides below go deeper than the specifications in Section 8 — effect-by-effect file preparation, type and font detail, and the workflow notes our production team uses. Download the ones relevant to your project.

How Lenticular Works

The optics behind the effect — lenses, interlacing, and why lens direction determines whether you see depth or motion.

Detailed Design Guide

File preparation effect by effect — layer structure for 3D, background and contrast guidance for flip and morph, zoom and motion setup, and type sizing by lens pitch.

Small Format Design Guide

Specifications for hand-held and counter-size pieces, where tighter resolution and simpler backgrounds matter most.

Lenticular Effects

Flip, morph, zoom, full motion video, and 3D, with the viewing direction each one needs and the applications each suits best.

Large Format Design Guide

Specifications for oversized work: file formats, resolution, bleed, background extension for 3D, and font guidance for pieces viewed at a distance.

Lenticular Glossary

Working definitions of the terms you’ll encounter in a project — pitch, parallax, phase, window plane, ghosting, and the rest.

Let's talk about Your Project

Contact Tracer to schedule a consultation, request a quote, or explore Express Solutions.